Preparing Photos for Wood Laser Engraving (Glowforge & xTool)
A photo for wood laser engraving needs more prep than a photo for any other material — because wood
fights back. It burns dark on a light surface, its grain competes with facial detail, and every species
takes the beam differently. Most disappointing results on a Glowforge, xTool, Ortur or OMTech have
nothing to do with speed and power: the image was never ready for wood in the first place. This guide
covers how to prepare a photo for engraving on wood — from picking the board and the source photo to
restoration, contrast and background removal — before you ever touch the dithering step.
Why wood is unlike any other engraving material
On black granite, the laser marks light on dark: the beam etches bright dots, so the photo keeps its
normal tonality. Wood works the other way around. The beam burns dark marks into a light
surface, which means dark areas of your photo become heavy char and light areas stay untouched
board. If a portrait already leans dark — evening shots, shadowed faces, dark clothing against a dark
background — most of the plaque turns into one muddy burn with no face left in it.
Wood adds two more complications no photo editor can ignore:
Grain. The natural pattern of the wood shows through every midtone. Fine facial
detail — eyes, hair strands, skin texture — has to be strong enough to read on top of it.
Uneven burning. Softwood and resinous patches char faster than the surrounding
material, so subtle gradients that look smooth on screen come out blotchy on the board.
The practical conclusion: a photo that would engrave fine on granite or anodized aluminum can still
fail completely on wood. It needs cleaner separation between face and background, bolder midtone
contrast, and no reliance on delicate shadow detail.
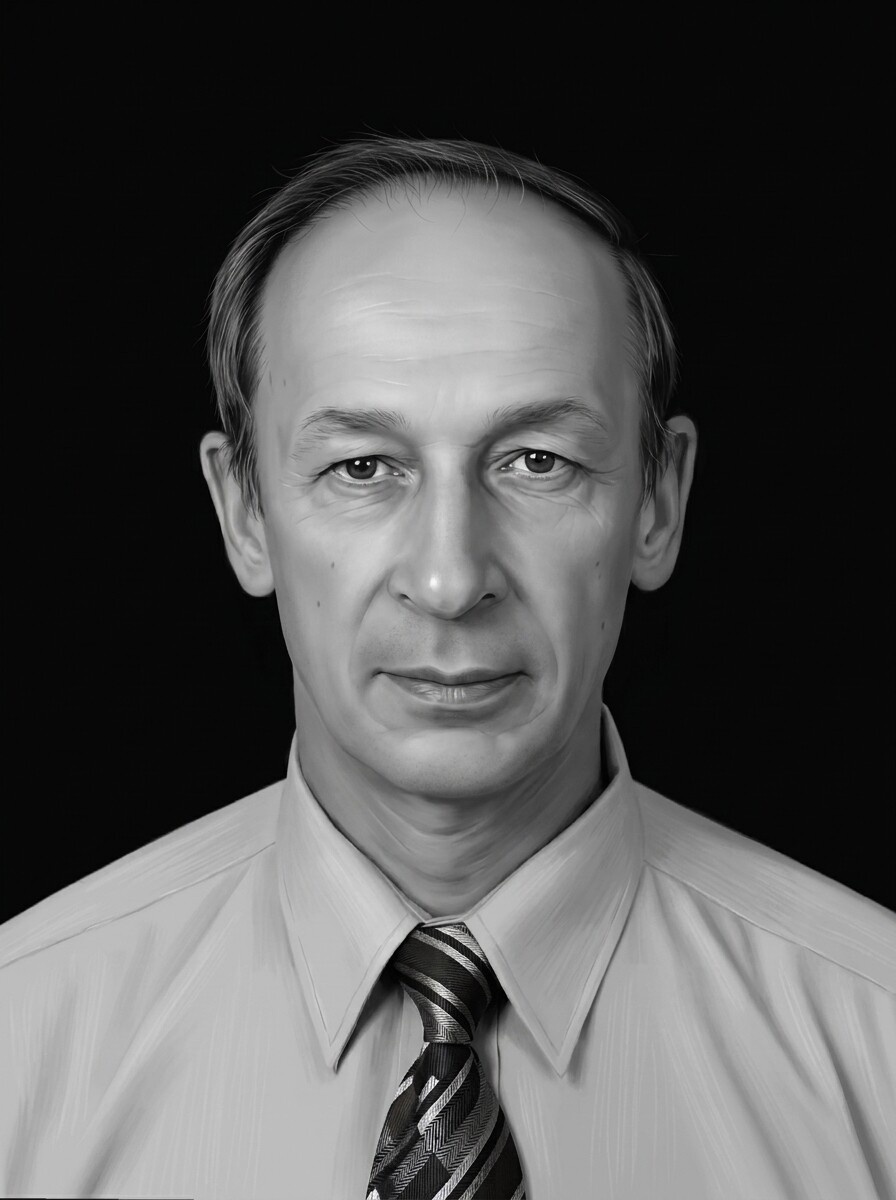
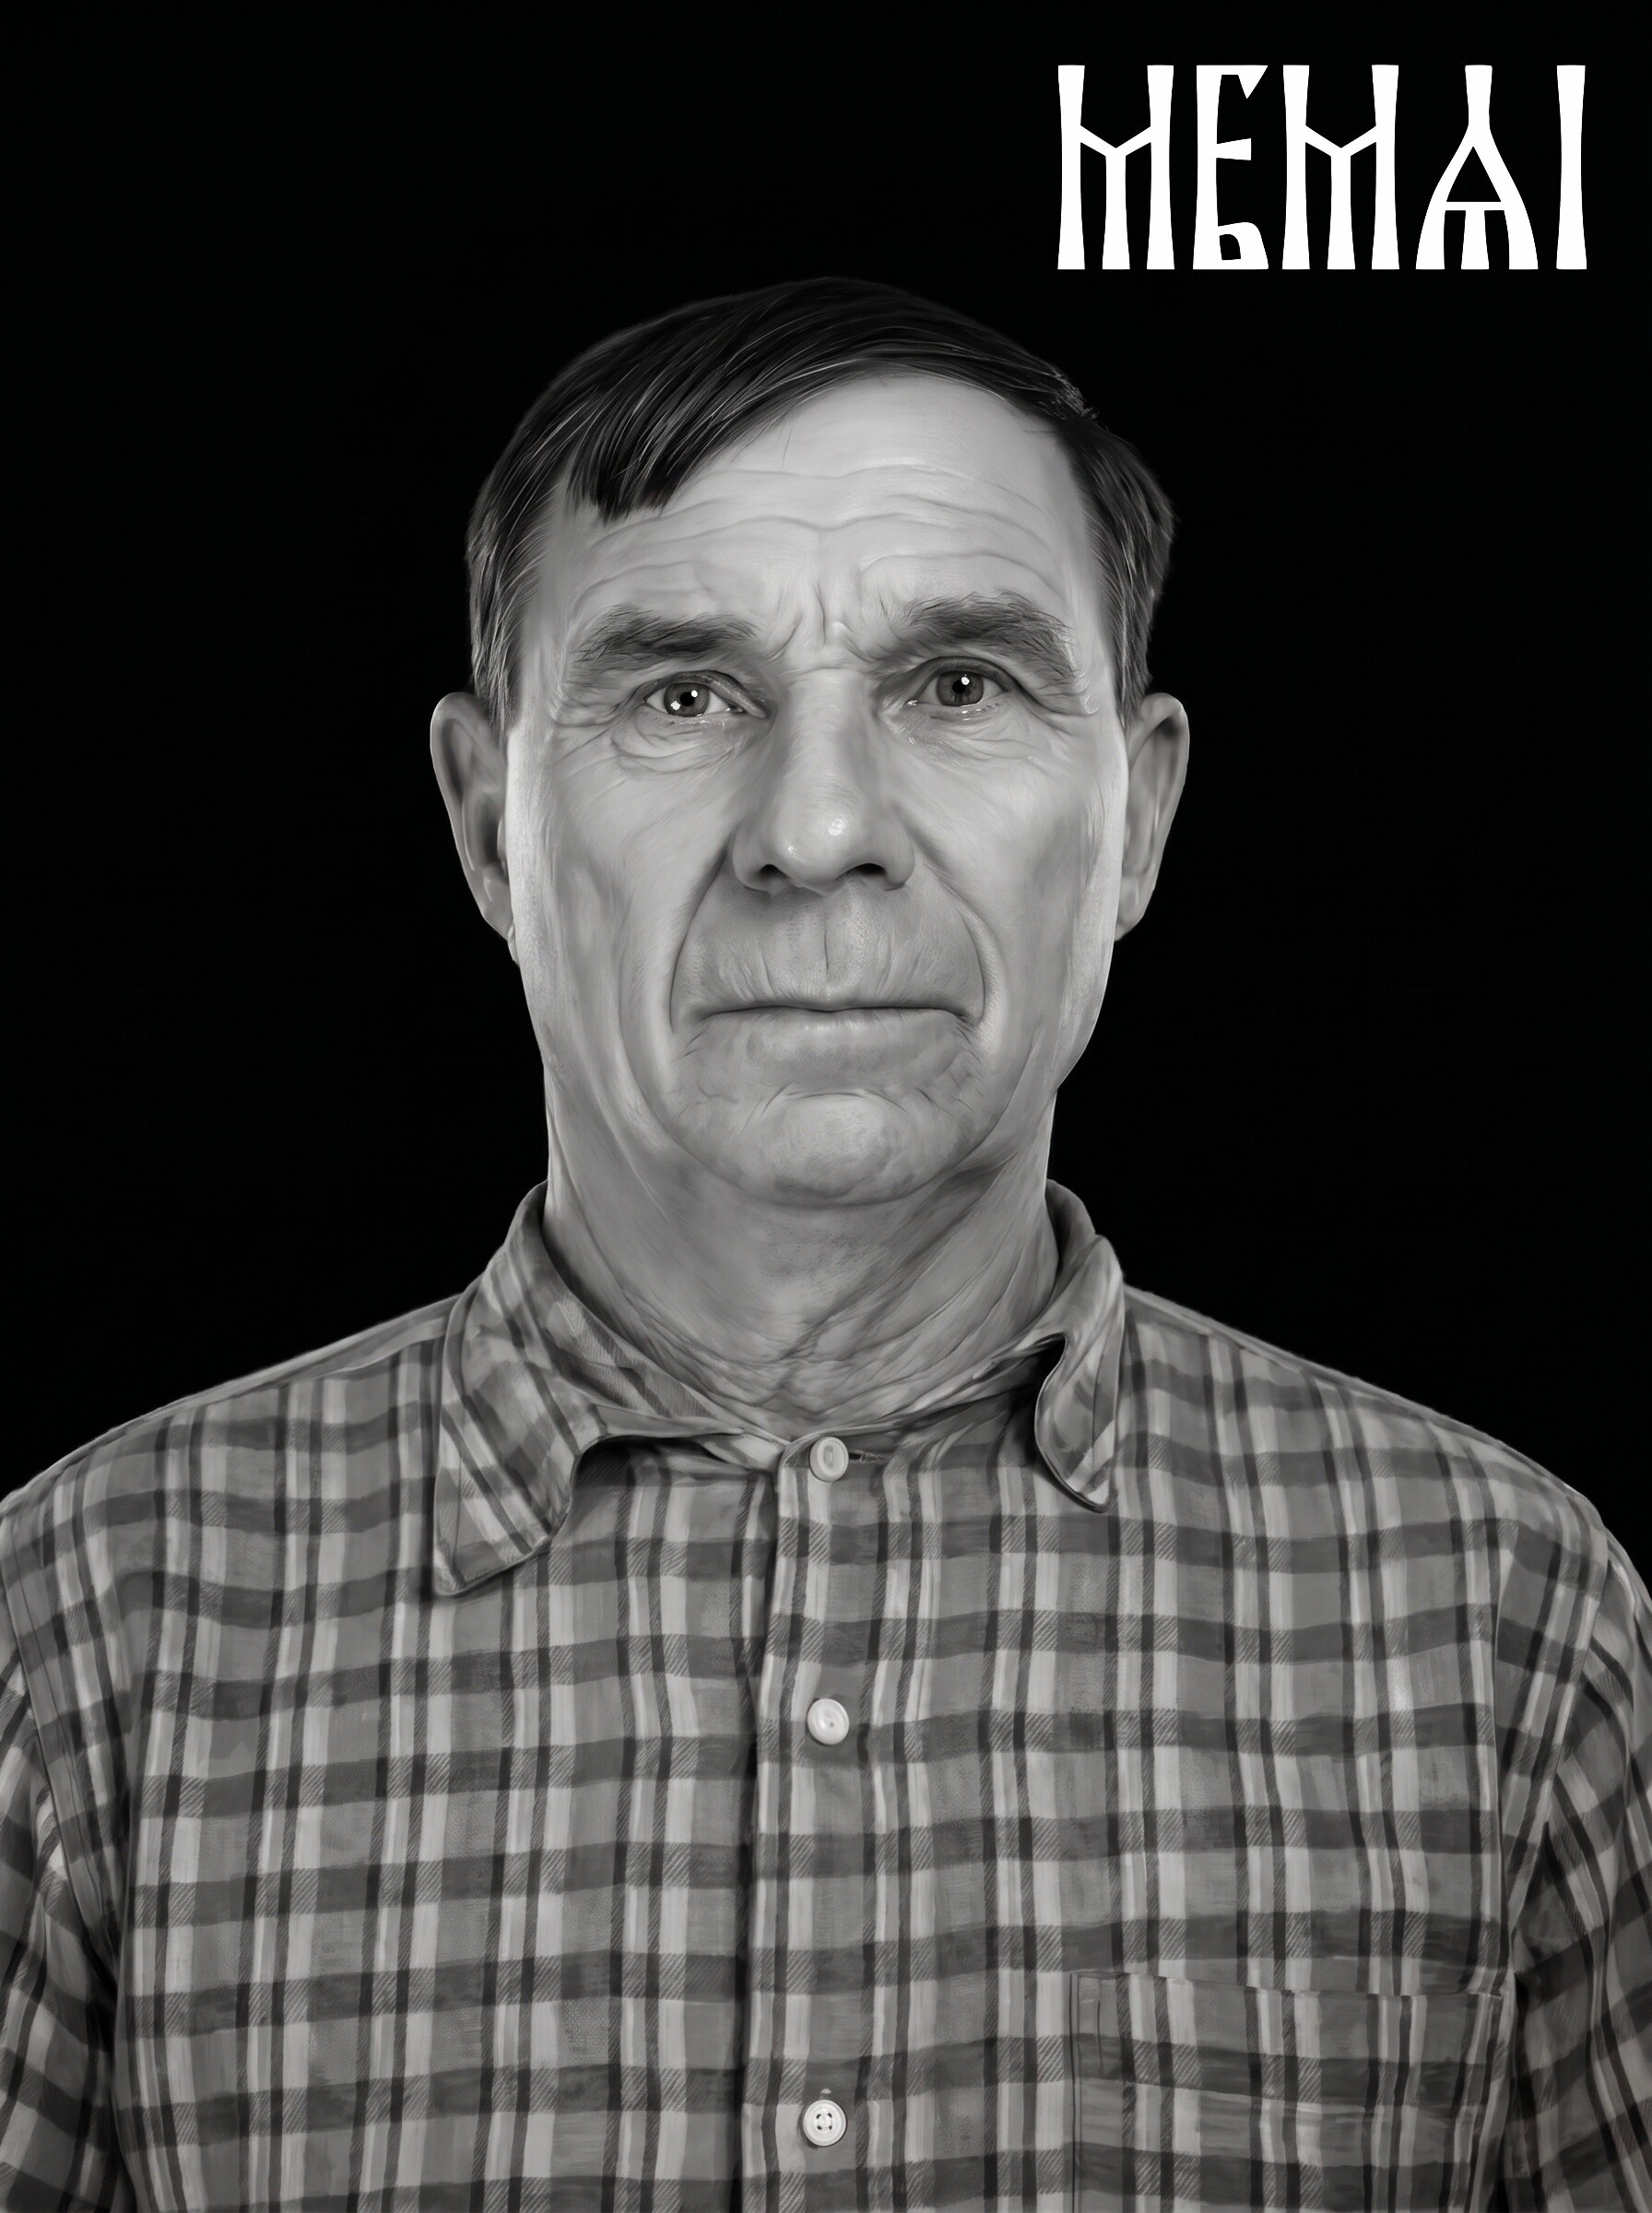
Before
After
Flat, low-contrast source turned into a clean portrait with the tonal separation wood engraving needs.
Choosing the wood (briefly — it matters more than settings)
This is a photo-prep article, not a materials review, but the board you pick sets the ceiling for the
whole job. Photo engraving wants a light, even-toned surface with tight, quiet grain:
Good: maple, basswood, alder, cherry, quality Baltic birch plywood. Light color
gives maximum contrast range; fine grain stays out of the portrait's way.
Difficult: oak (loud grain that cuts straight through faces), construction pine
(resin pockets burn unpredictably), dark woods like walnut (less contrast headroom — workable, but
the photo needs to be prepped even brighter).
Whatever you choose, run a small test burn on the same board before committing a portrait to it —
the same file behaves differently on maple and on birch ply from two different suppliers.
What makes a good source photo for wood
Photo prep for a diode laser or CO2 machine can improve a photo dramatically, but the source still
sets the limits. Before anything else, check the photo itself:
The face is the subject. The head should fill a good part of the frame. A tiny
face cropped out of a group shot has very little real detail to work with — restoration helps, but
more pixels of face always beat fewer.
Even, soft lighting. Harsh side light splits the face into a bright half and a
black half; on wood the dark half becomes a solid burn. Flat, front-lit photos engrave best.
Real resolution. Aim for roughly 300 DPI at the final size — about 1500×2100 px
for a 5×7" plaque. Messenger-compressed thumbnails and social media avatars need restoration
before they are usable.
Open eyes, minimal obstructions. Sunglasses, heavy shadows across the eyes and
strongly turned profiles all read poorly once the image is reduced to burn/no-burn dots.
The background, on the other hand, barely matters at this stage — a busy background is one of the
easiest problems to fix in prep, and on wood you almost always want it gone anyway.
The prep workflow: fix the photo before you dither
Dithering software — LightBurn, the Glowforge app, xTool Creative Space, ImagR — converts a grayscale
image into the dot pattern your machine burns. What it does not do is repair the
photograph. Feeding a damaged, flat, cluttered photo into a dithering algorithm just gives you a very
precisely dithered bad photo. The order of operations that actually works:
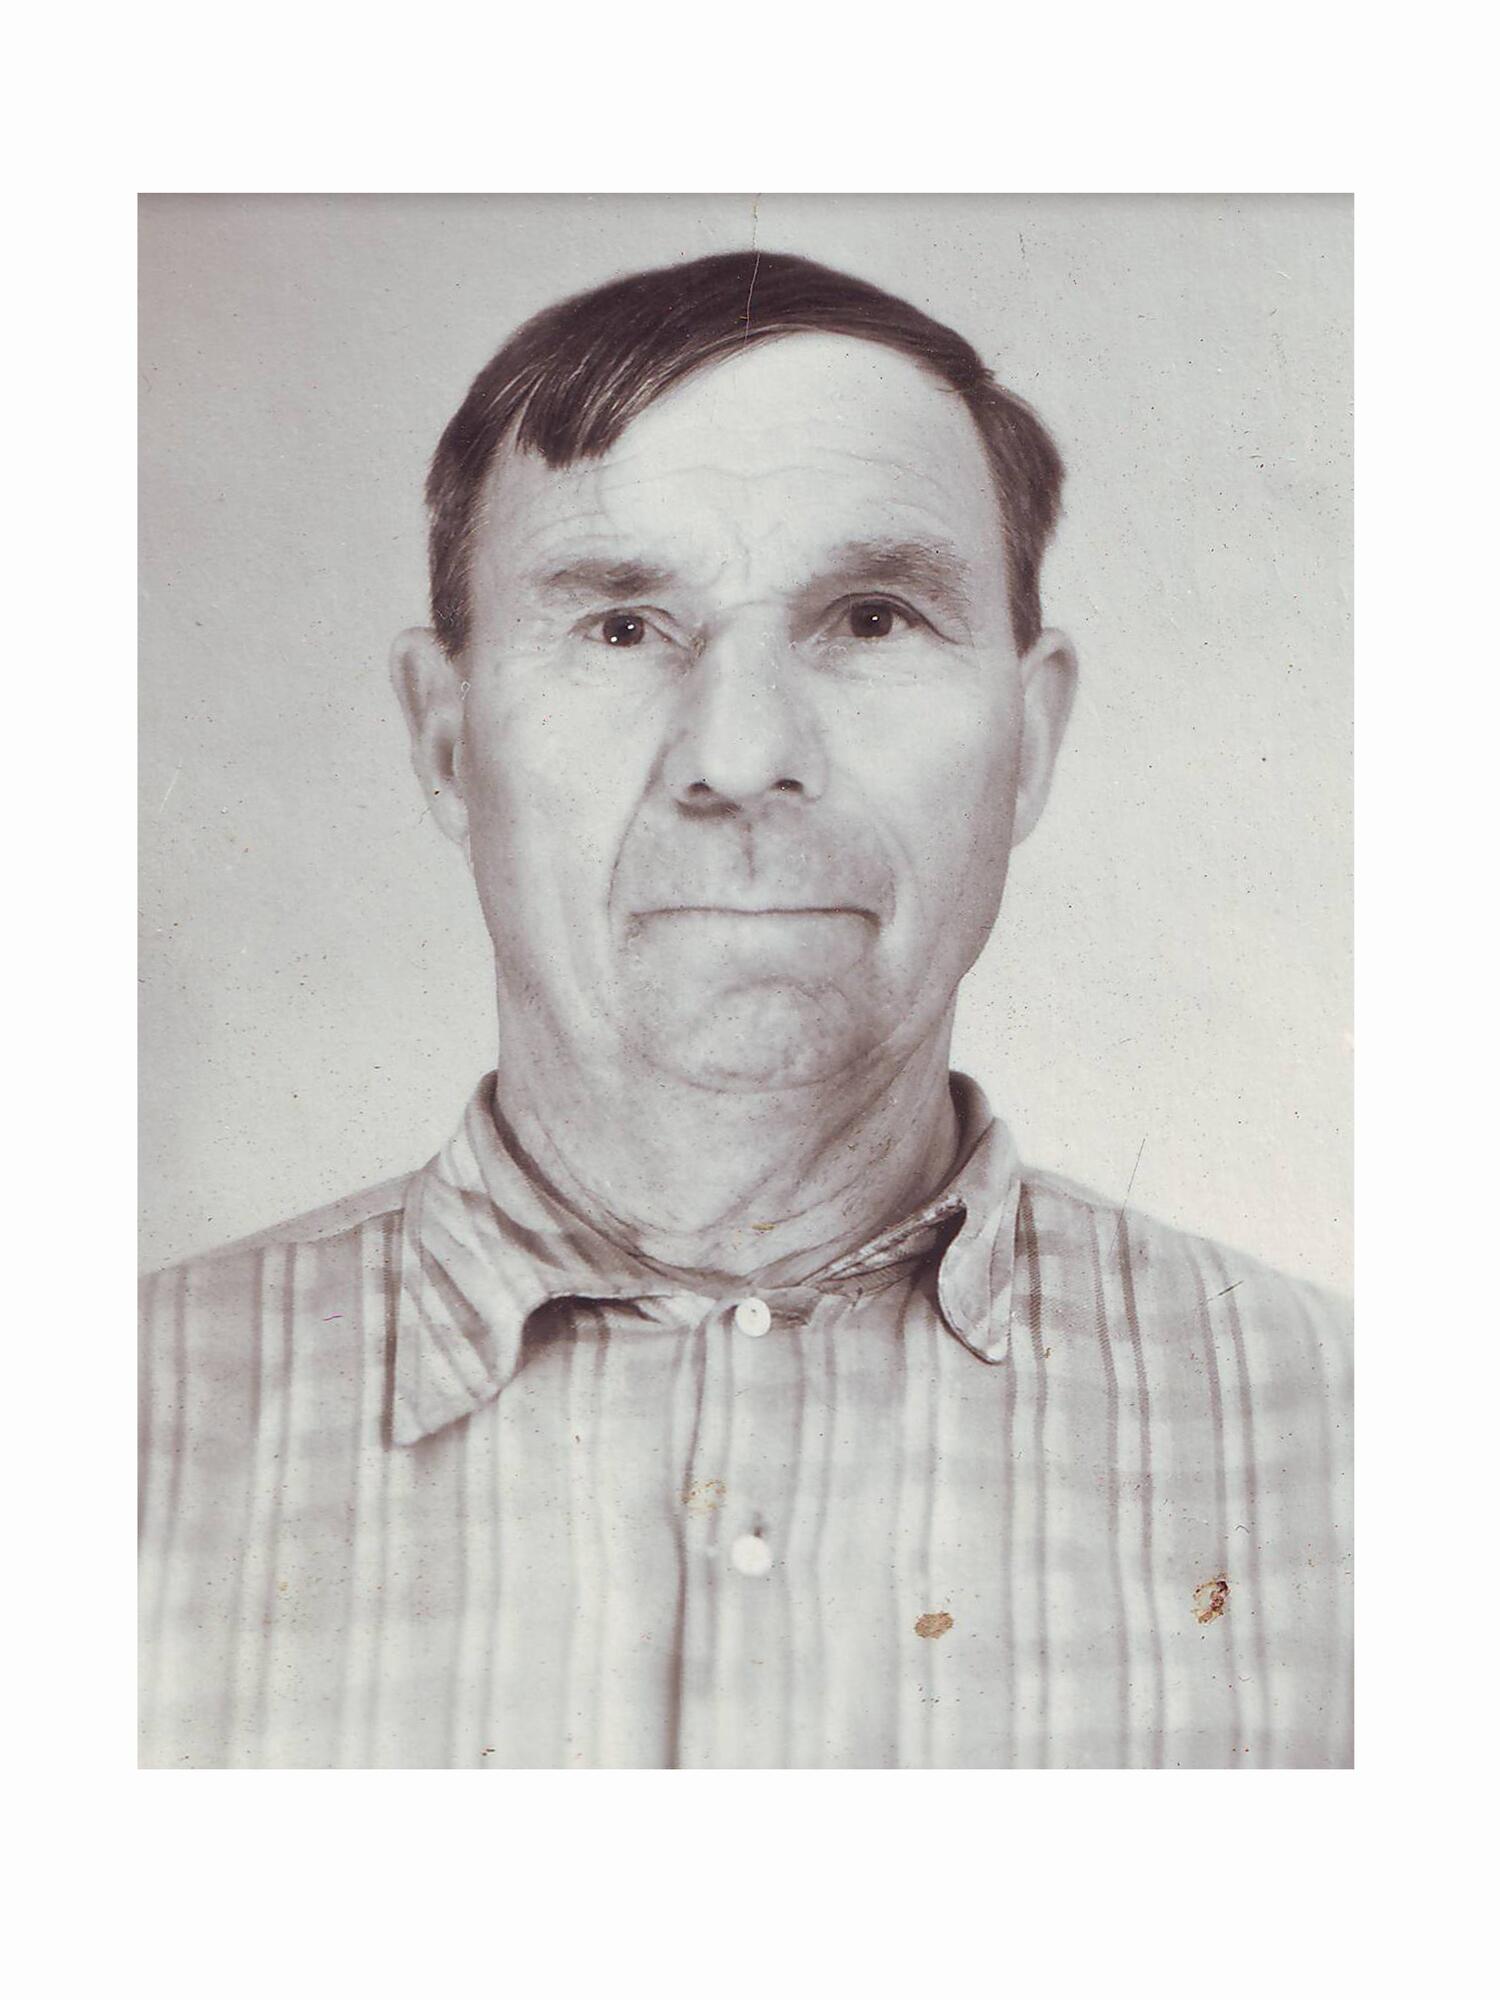
Step 1 — Restoration
Scratches, creases, fading, compression artifacts and soft focus get repaired first. This matters
doubly for wood: every defect that survives becomes a burned artifact, and grain makes it look worse,
not better. AI restoration rebuilds facial detail while keeping the person recognizable — critical
when the photo is going on a memorial plaque, where the family will
compare every engraving against their memory of the face.
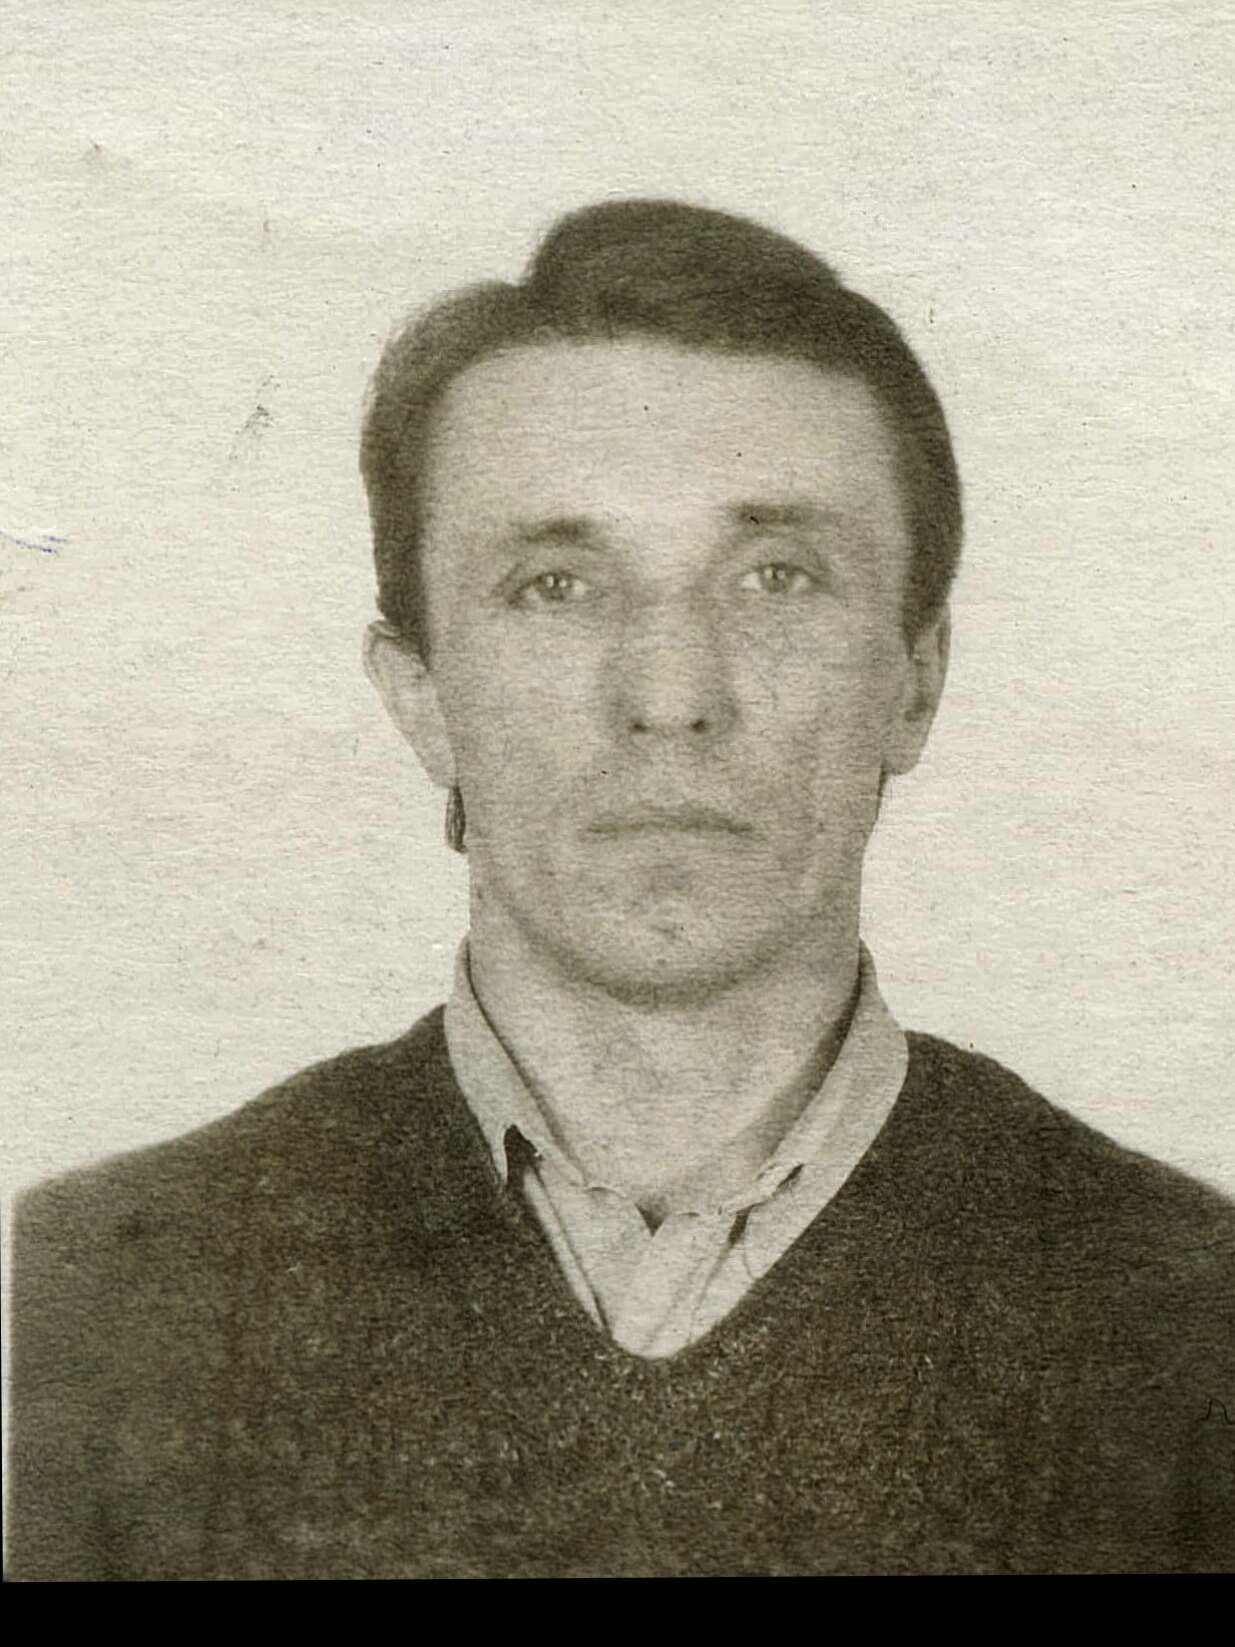
Before
After
Soft, low-resolution source restored to engraving-grade sharpness — without changing the face.
Step 2 — Retouching and contrast shaping
Next, the portrait is retouched for the machine rather than for the screen: skin is cleaned without
the plastic look, hair and eyes are strengthened, and the tonal range is compressed into the midtone
band that wood can actually reproduce. Deep shadows are lifted so they don't turn into char; fragile
highlights get enough structure to survive the grain. Generic photo-enhancer apps skip this — they
optimize for a glossy on-screen look that engraves poorly.
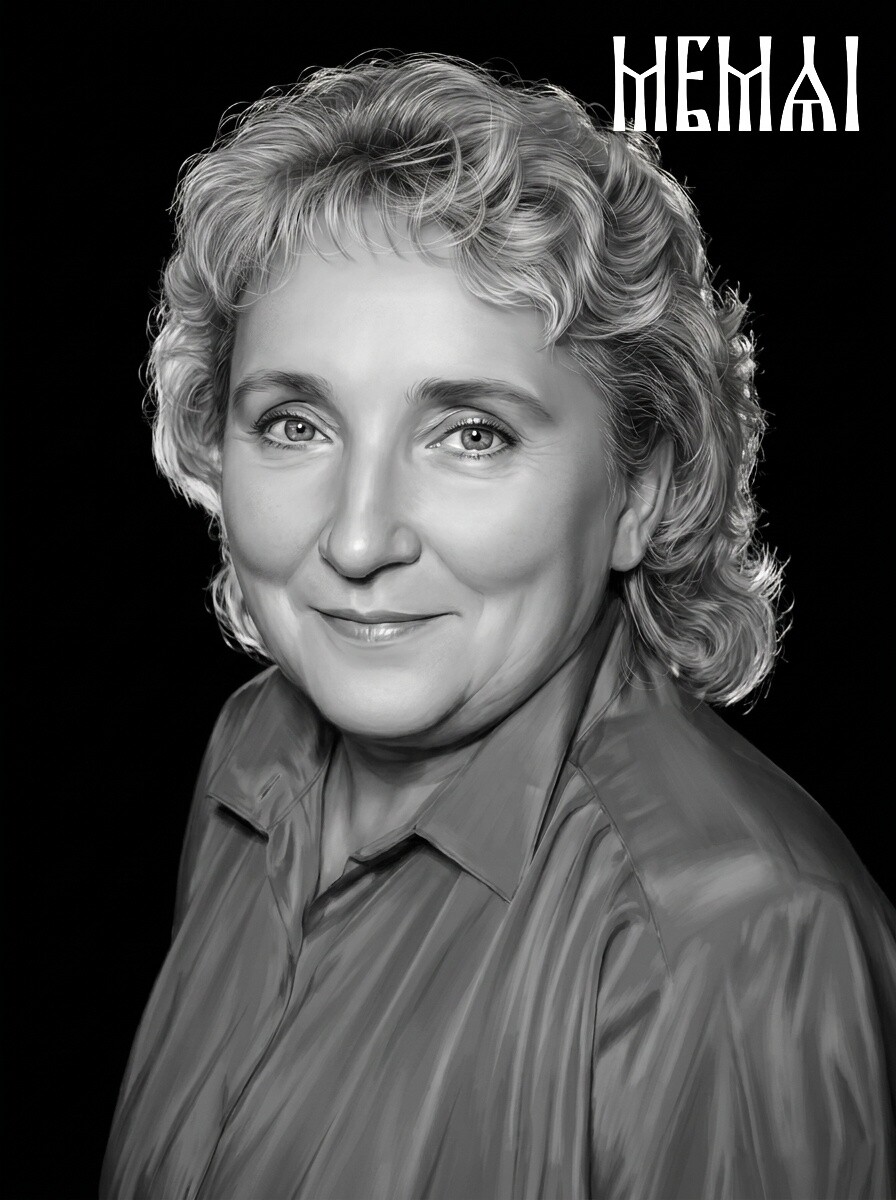
Step 3 — Background removal
On wood, background removal is close to mandatory. Every gray pixel behind the person costs burn time,
adds char around the face and muddies the composition on an already-patterned surface. A clean subject
on untouched board — or with a soft halo — looks deliberate and professional, engraves faster, and
leaves room for names, dates or a laser-cut frame.
Before
After
Busy background stripped out — the laser burns the face, not the noise around it.
You can do all three steps by hand in Photoshop or GIMP if you have the skills and an hour per photo.
Or you can let an AI pipeline built specifically for engraving do the whole sequence — restoration,
retouching, background removal — and hand you a machine-ready grayscale file in about 5 minutes.
Try it free — first photo on us
Upload a photo and get an engraving-ready portrait in about 5 minutes: restoration, retouching and
background removal in one pass. No Photoshop, no signup — see the result on your own photo first.
Dithering and machine settings: where photo prep ends
Once the portrait itself is clean, sharp and high-contrast, then it's time for the part the
forums argue about. We'll be honest about the boundary here: engraving settings depend on your
machine, your lens, your DPI and the exact board on your bed — no article can hand you
universal numbers, and anyone who does is guessing. A 10 W diode xTool, a 40 W Glowforge and
a 60 W OMTech CO2 want completely different speed/power combinations for the same file.
A few things do hold generally: let your software (LightBurn, Glowforge app, xTool Creative Space)
apply the dithering — Jarvis and Stucki are the usual starting points for portraits on wood — and
don't pre-dither the file yourself, because a dithered image locked to one DPI falls apart the moment
you resize it. Keep the image resolution at or slightly above your engraving DPI, and always run a
small test patch on the actual board before the full burn. If you're getting muddy results even with
a well-prepped file, the troubleshooting checklist in
Why Your Laser Engraved Photo Looks Bad walks
through the usual causes one by one.
A note on the Norton white tile method
You'll also see stunning photo results from the Norton white tile method — coating a
ceramic tile with paint or specialized spray, then fusing a dark mark onto it with a diode laser. It's
a different material with its own community recipes, and we won't pretend to be the guide for it. But
one thing carries over completely: tile is even less forgiving of a bad source image than wood, since
the method produces crisp near-1-bit marks. The same prep — restoration, contrast shaping, background
removal — is exactly what separates a striking tile portrait from a smudge, whichever coating recipe
you follow.
Common mistakes that ruin photo engravings on wood
Engraving the photo as-shot. Straight-from-phone photos have neither the contrast
nor the clean background wood demands.
Over-sharpening instead of restoring. Sharpening a blurry face creates halos and
crunchy edges that burn as artifacts. Restoration rebuilds detail; sharpening just exaggerates what's
there — including the damage.
Keeping a gradient background. Smooth gray gradients dither into visible banding
and eat engraving time. Remove the background or replace it with clean white.
Ignoring the grain direction. Strong horizontal grain through the eyes is
distracting; orient the board so the grain runs with the composition, not across the face.
Testing settings on the final board only after the full burn fails. A 2-inch test
square costs minutes and saves plaques.
The bottom line
Wood photo engraving rewards preparation more than any settings tweak. Pick a light, tight-grained
board; start from the best source photo you can find; then restore, retouch and isolate the portrait
before dithering. Get those right and a mid-power Glowforge or xTool will produce plaques
that look hand-etched. For the material-independent fundamentals — resolution, formats, tonal range —
see the complete photo prep guide.
FAQ
What resolution does a photo need for wood laser engraving?
Aim for roughly 300 DPI at the final engraving size — for a 5×7" plaque that's about
1500×2100 pixels. More important than the number is real detail: the face should be sharp when you
zoom in. If your only copy is a small, compressed image from a phone chat, run it through AI
restoration first — upscaling alone won't recover facial detail.
What is the best wood for photo engraving?
Light, tight-grained woods show photo detail best: maple, basswood, cherry and good-quality
Baltic birch plywood are the usual choices for Glowforge and xTool machines. Avoid heavily grained
or resinous woods like oak and construction pine — the grain pattern and resin pockets compete with
the portrait and burn unevenly.
Do I need Photoshop to prepare a photo for wood engraving?
No. The heavy lifting — restoration, retouching, contrast shaping and background removal — can be
done automatically by an AI prep service in about 5 minutes, in the browser. The final dithering
step is then handled by the software you already use: LightBurn, the Glowforge app or xTool Creative
Space.
Should I dither the photo myself before importing it?
Usually not. Import a clean, high-contrast grayscale portrait and let your laser software apply
the dithering (Jarvis, Stucki or the machine's photo mode), because the correct dither depends on
your machine, DPI and material. Pre-dithering locks you into one resolution and one material. What
you should do beforehand is fix the photo itself — restoration, contrast and background.
Ready to engrave better portraits?
Create a free account and prepare photos for wood, granite, metal and tumblers with one AI pipeline —
machine-ready files at affordable per-photo pricing, no subscription required to start.
 Before
 After
After
 Before
 After
After
 Before
 After
After